Showing posts with label crafty. Show all posts

Tuesday, June 21, 2011

Jonah's Nursery

With only 4 weeks left until my due date, I've decided it's high time I reveal this nursery I've been working on.
His room is filled browns and blues, birds and trees, and lots of love! I wanted a room where serenity and relaxation take center stage. But I also wanted it to be functional, along with reflecting the old-time style Jeff (husband) and I love.


Upon moving into our house here at Fort Campbell, we were told that while we indeed were allowed to paint, we would have to paint it back to white before they start renovating our house. Renovations are scheduled to start this fall, so we decided against painting until after that. With that said, the nursery is not as... "warm" as I would have liked it to be. But I'm still happy with the way it's turned out.


Before Jack was born, I made him a plaque with his name and zoo animals on it. It's one thing I've held onto through all our moves. So Jeff and I decided Jonah definitely needed one too. I found all the materials for this at Hobby Lobby (with the help of aunt Erin!). I just love the font of the letters, it's quite adorable. I used acrylic paints, an aqua, a chocolate brown, and a cream (for the letters and also to white wash the aqua background). The owl and tree I bought already painted because I was feeling lazy they were on sale. Add some wall hangers on the back and your done.


This shelf was one I inherited from my mom's house. She didn't want it anymore, and FREE is my favorite. That way, if my plan doesn't work and I mess it up while I'm fixing it up.. I'm not out anything. Somehow that helps me cope with the many craftfails I've experienced. This shelf got a coat of the same aqua paint I used for the name plaque, and very light streaks of cream to soften it up a bit. The hooks were removed, painted with the chocolate bown, and re-attached with some wood glue.
The brown chick you see, I found at a flea market in Washington (it's legs are made of newspaper! How cool is that?).  It's little nest came from the thrift store. The birdhouse, my wonderful mother painted. And the two ceramic birdies on the other side were painted by someone (whom I can't remember at the moment) in my husband's family years ago.


Oh glider! Oh, how I have missed you this past year. Glider is one of the unfortunate pieces of my furniture I had to leave behind when I moved back to Washington last year. I'm so happy to have it back, and he is happy to be in his new home I believe. Joined with a wicker side table that came from Goodwill for $10, and a corkboard to hang all of Jonah's pictures, "Congrats on Baby" cards, and other fun paper trinkets. The corkboard obviously got a paint job too. The owls were super simple to add. I chose a picture of an owl (who's sillouette I liked), blew it up to the sizes I wanted, printed them off, and cut out the middles to leave the stencils for me to use.
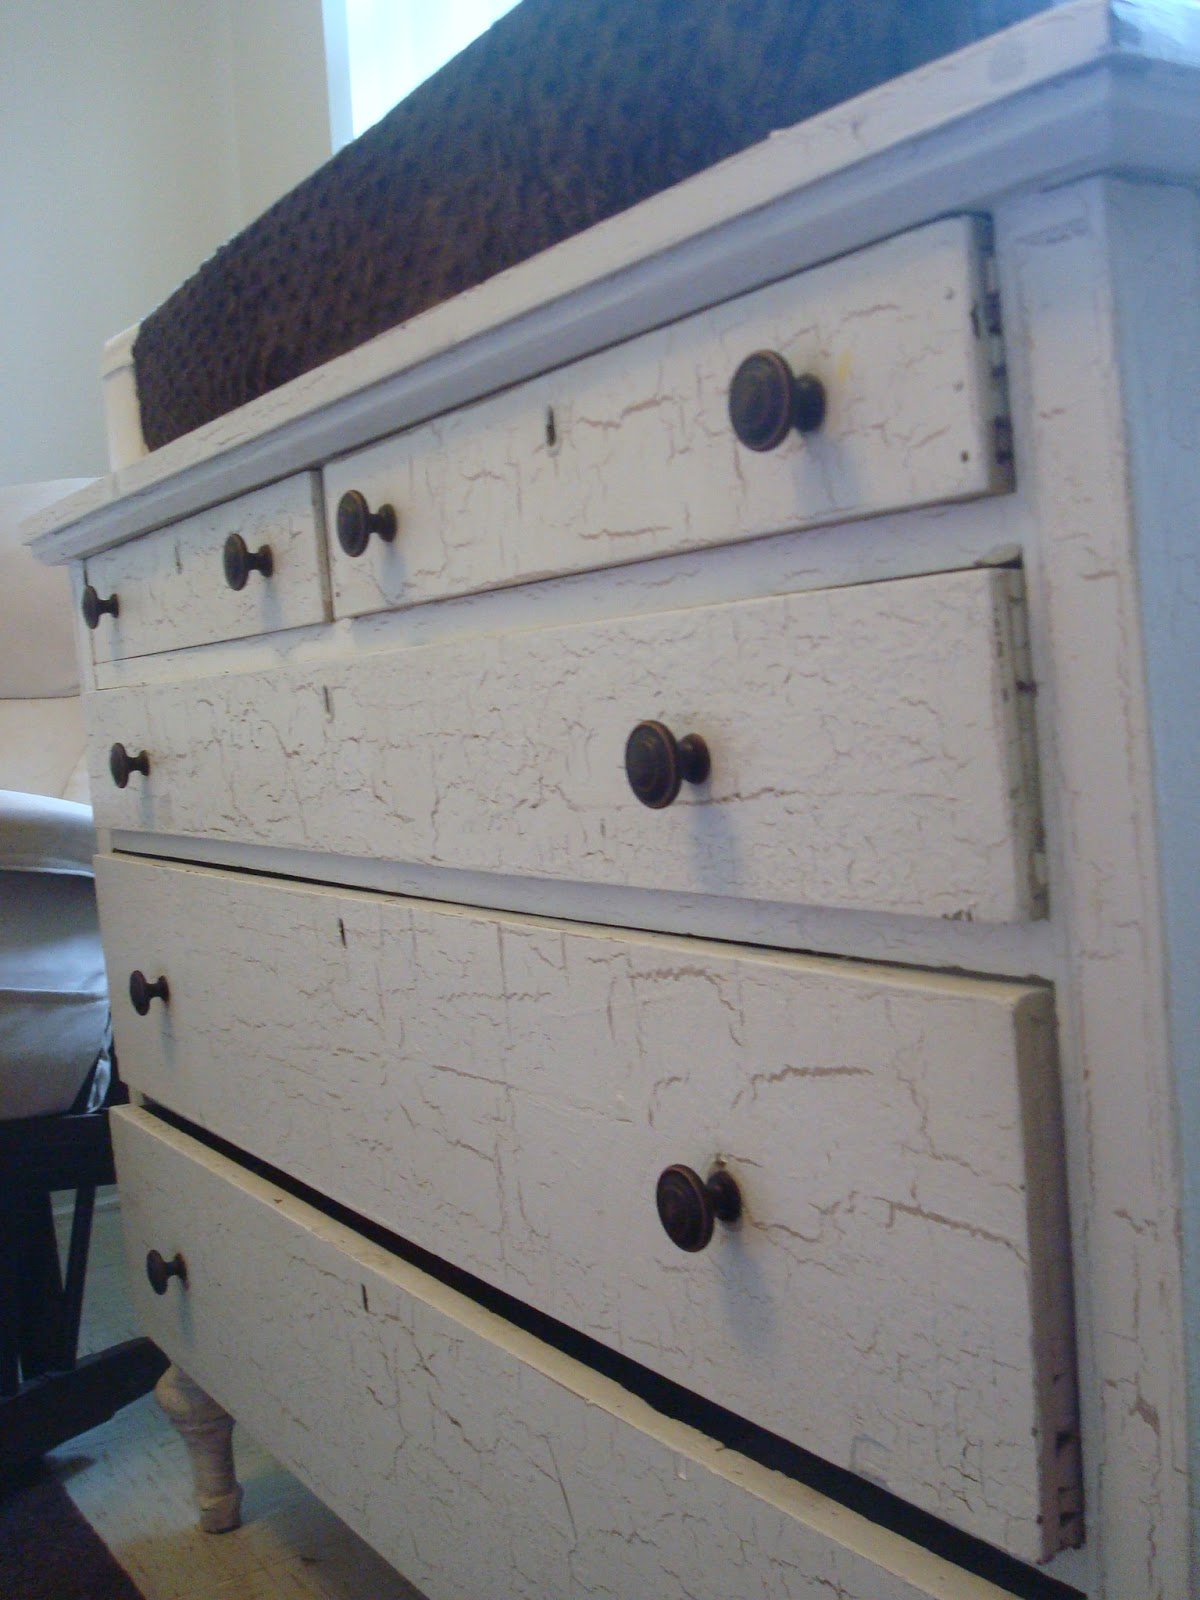

This awesome antique dresser also came (FREE) from my mom's house. They bought my little sister a new bedroom suite a few months ago, and this thing was just going to go to the trash! Remembering that it already had the crackle paint look that I loved (and used on Jonah's rocking chair you can see here), I begged her to save it for me! It is old, but it still has a few more years left I believe. Lots of bleach wipes to make it safe to hold Jonah's clothes, and some new knobs from Lowe's give it new life.

Jonah's closet and a super cool shelf (from Hobby Lobby's clearance sale) competely the room.


The holder thingy on the door is for diapers (and whatever else it ends up being a good place for). It will eventually get some brown and aqua owls stenciled on as well.


I love this shelf. Well, I love the things on it.. but I love the shelf too. The deer are another pair that came from Jeff's family. The two candles and the ceramic bird are from TJ Maxx. And let me tell you, that white candle... I'm not sure what the scent is... But it's amazing. And it fills the whole room with it's.. self?

And see that lamp? Yeah... I made that! Well, sorta. You see, I orignially bought a lamp (I know I know, crazyness) It was adorable, but it didn't survive the move :( The only thing we could salvage is the aqua blue, paisley lamp shade. Now I needed a lamp... wait... I had a lamp! I had bought a lamp from Goodwill over a year ago that I liked the design of. Only problem, it was BRASS. YUCK! So, chocolate brown paint to the rescue, and waaa-laaa. New problem, the lamp was too short for the lamp shade. It ended up looking very 70's.
Brainstorming took a couple days but I finally came up with this..
And folks.. behold the ONLY craft project I've ever tried that turned out almost exactly like I wanted it to...

I measuring the bottom of the lamp, a perfect 5 inches. Off to TJ Maxx to find a vase. What do you know... they have one thats exactly 5 inches in diameter... score!
A fake flower and stones I already had add in the "nature" and "serene" feel I wanted. A little gorilla glue to hold it together and done!
Here's the part that makes me say "almost like I wanted". You can barely see it in the picture but the little brown base below the vase wasn't in my original plan. After it was finished, it wasn't really looking quite finished to me. It looked like I made it, and I didn't want that. It needed a brown base. Sitting in my kitchen I searched and searched and searched for something flat, round, and about 5 in across. Plate? no, it would look to much like a plate. Wooden Drink Coaster? no, my coasters are only 4 in.
Citronella candle lid? YES!
What are the odds that the lid to the citronella candle
(like this one)
would fit perfectly on the bottom of my lamp?
Lesson learned... Try everything, you never know what might work.
Painted with a coat of brown paint, I attached the upside-down lid to the bottom of my lamp with gorilla glue. Now it was done, really finished.

Last but not least the birdhouse I made a while ago, and the owl pitcher I found at a flea market (see blogpost here), along with a picture frame, find a spot on the second shelf.


So, what do you think? What does your baby's nursery look like? Did you blog about it? post a link! I'd love to see them :)

Being the perfectionist that I am, I almost always have something else I'd like to do or something I wish I would have done. But I can honestly say I'm truly happy with Jonah's nursery. I cannot wait to bring him home :)



Thursday, June 2, 2011

Gettled Settled

So far we have accomplished the following:

*bought rugs for the living room & boys' rooms
*unpacked ALL boxes
*bought Jonah's swing (it plugs into the wall, rather than going through 6 "D" batteries a week)
*put together Jonah's crib
*decided on a "theme" for Jack's new room (Trucks/cars/all things with wheels!)
*ordered new bedding for Jack's said room
*Washed all of Jonah's clothes to get them ready for him
*Been to both the comissary and Px more than once
*Enjoyed a local festival (Craig Morgan was there!)
*Started to hang wall decor
*Took Jack to the splash park
*Had two baby appointments at Blanchfield Army Hospital.
*Decided a second C-section is what's best for Jonah and I.
*Found out I'm severely anemic, upped my iron dosage, and started feeling much better and less exhausted.
*Jeff has started inprocessing.
*Jack has learned new words and phrases like "shoe", "sorry", "woo wee" (as in "woo wee, it's hot!" he picked that one up from me by accident), "huuuuhh ya!" (as in "huh ya, karate chop!"), and "nose"
*I scored a super cute maternity shirt for $6 from Old Navy last weekend that actually makes me feel cute being 8 months pregnant.
*Forgot how many bugs there were in the midwest in the summer, were reminded how many bugs there are in the midwest in the summer, bought bug zapper, bug spray, and a citronella candle immediately.
*I crafted something for our friends' baby boy (She's getting induced today, Congrats Amber and Mark!)

*I liked Trent's sign so much, I decided Jonah needed one too


It's starting to feel like home...


Thursday, April 14, 2011

Rocking Chair Cushion

After finishing Jonah's rocking chair it still wasn't looking... well... finished? So I made a cushion.

At first I thought the fabric I chose would be too girly. It's a teal/robin egg blue and the designs are brown. But I think it'll go great in his room. And I have a lot left over so I can use it for something else too!
 
Complete with ties on the back and everything! I'm pretty proud of my sewing work, I didn't even use a pattern.

The cushion is a little small in comparison to the chair seat, I didn't account for it shrinking up a little after I stuffed it. Lesson learned.

Jonah's big bro' has been loving his chair. I can't wait to set it up in Jonah's room!


Saturday, April 9, 2011

Rocking Chair Refinish

Even though we're moving 3000 miles to a new house before Jonah's arrival, I've still been busy working on things for his room. So that I won't have much to do but set it all up when we get into our new house.

Two-ish weeks ago I found this rickety, old rocking chair at Goodwill for $10 bucks. I almost passed it up because it was (in all honesty) pretty gross. But that's nothing some bleach wipes and some wood glue couldn't fix.
[All cleaned up and ready to start the makeover]

I can remember loving a little rocking chair like this when I was little. If I'm not mistaken, my grandparents bought all of their grandchildren one. I loved mine, and I wanted to continue the tradition onto my kids. Jack was already lovin' it when we brought it home, he even helped me clean it up. And with a little sprucing up, it'll be perfect in Jonah's old-timey nursery.

First thing I did was take those weird little plastic cuffs off the rockers. I think they were originally put on to help keep the chair from rocking too far forwards or backwards. I'm all for safety but they were yellowed and yuck. Also, if you look closely at the picture you'll see what looks like a tan jewelry box attached to one of the rockers in the back. It took us a while, but we figured out that it was "supposed" to play a lullaby tune when the chair is being rocked. It sort of sounded like a dying cat. So off it came, as well.
After a coat of primer and a base coat of brown paint here's what it looked like:

I know, I know "Kate, why did you prime it just to paint it back brown?"
Here's why... Look closely, that shiny coating that's half covering the seat? It's crackle paint!

[Americana Weathered Wood Crackle Medium]

As I mentioned before, Jonah's nursery is going to be antique, old-timey, and adorable if I do say so myself. I've been waiting for the chance to use this stuff, and this was the perfect opportunity! *happy dance* After the crackle paint went on, I added the top coat, creamy white.
And here's a close up of the crackle effect:
Pretty cool huh?
It wasn't too terribly hard to work with. You just have to make sure to do one swift brushstroke of the top coat, otherwise the crackle medium causes the top coat to separate too much. (It's hard to explain what happens, but trust me it just looks weird).

And here's what happens when you forget to even put the crackle medium on:
Oops! Ah well, at least it's on the underside so no one will see it... right?

Here's the finished product!

It's not perfect, but I kind of like it that way. There's places where the paint isn't even (lots of them, because I made it), but I think it still turned out pretty darn good. 


What do you think?
The chair cost me $10 and the crackle medium was $4. (I already had the brown and cream white). So, total = $14!

Next up, a cushion for the seat!

Monday, March 21, 2011

Planning Jonah's room

Because we are moving to Fort Campbell soon, I can't set up Jonah's nursery (obviously) until we get there. I will have about a month to get everything ready for him once we get there. Which is plenty of time normally, but I also will  be unpacking and setting up in our new house during that time! Oy, makes me tired just thinking about it.

So to avoid as much stress as possible (and just because I'm an avid planner and a teensy bit OCD) I'm trying to make and aquire as much of the smaller items we'll need before we move. So that all I have to do when we get there is set it up!

You are probably going to think I'm crazy, but the theme I'm using is a vintage-y, natural, birds/owls one. With colors like light blue, navy blue, white, cream, and dark brown. And materials like wicker, branches, ceramics, cloth, and canvas. I saw a nursery done in this type of decor and I feel in love, I'm using it as inspiration. I promise it'll make since when it's all put together.

This weekend, I enlisted the help of my husband for another project. I love including him in my projects recently, he is a great help and I love creating things (especially for our children) with him. Thanks, babe!

I can't claim this idea.. but I can't for the life of me remember the blog I got it from. I'm about 75% positive is was Oh Dee Doh

Anyways, I love this idea because it's cheap and ends up looks very unique (and its perfect for Jonah's nursery!)

First you need a pre-made wooden birdhouse.. You know the ones you find at craft stores that are meant for your kids to paint? I found mine in the craft section at walmart for just under $5. Next, raid your local goodwill or thrift store for an old hardback children's book. This is important: make sure the hardback cover to your book is slighty bigger than the roof of your birdhouse when open. (This will make sense later)
I picked out this one because it's old and it has an owl on the cover so it will match Jonah's room. It was $1 at our Goodwill.

You also need Mod Podge, a foam brush or two, and scissors. And you might wanna cover the area with newspaper just to be safe.
(Sorry for the poor photo quality)

Next rip the pages out of the book, well don't "rip"... carefully remove is a better instruction.

I have to apolgize for not having any pictures of the main part of the process, both Jeff and I were covered in Mod Podge.
You are bascially going to pick the pages you want and cover the sides, and front and back of the birdhouse. Modpodge, and then apply the pages, and then modpoge on top of them to seal.
Here's a picture of it drying after we applied all the pages.
TIP: you can use a credit card or something like it to smooth out the air bubbles under the pages.
We used only the pages that had birds for this one but you can use pick and choose what pages you want to use and how to position them. It's all up to you. And we had some "wooden" showing at the bottom after covering all the sides, so we just cut strips from what pages we had leftover and used those to finish the bottom part.

I used a light blue paint to paint the roof edges before we added the book cover. Just so it will match Jonah's room better. Modpodge the whole roof and lay the book cover on top. (You may have to break the binding a bit). Let it dry and your done!

Here's our final product

I'm happy with it :)

We also found these at the Thurston County Flea Market this weekend
The white owl is actually a pitcher. But it'll be used to hold some sort of baby goodies.
(And yes we were starving afterwards, hence the KFC)


I can't wait to start setting up in a few months :)

Friday, March 18, 2011

I sewed something!

After much deliberation, I finally bought a sewing machine. (Not my first one, but the first one was crap so we didn't get along)
This is the lucky gal I picked
The Brother CE-5500PRW. She's been awesome so far, totally blows my first sewing machine out of the water.

I spent the first two days getting to know all (or most of) the stitches and how the machine works. But yesterday I tackled my first project!

We have an awesome store in Yelm (where I live) called Geegee's Quilting Inc. Jack and I went to check it out the other day. To say I was overwhelmed, would be an understatement. They have so much fabric. I can't even explain.. it was like diving into Mary Poppin's bag. Every corner you turned there was another nook with another collection of fabrics. No way could I decide on a project and fabric in there but I wanted to get something so I bought a few packages of quilting squares. One set I got was all spring-y fabrics, can't go wrong with that?
Now what to do with them...

How about some nifty placemats to get you in the spring-y mood!

Pretty simple process actually. I finished them both during Jack's naptime. The fabric was already cut into 5" x 5" squares. So I sewed them into columns of 3, ironed the seams, and then sewed the columns togethers to make a 3 x 4 rectangle.

And I had just bought some more dishtowels.. (because we ruined some of ours cleaning up all the primer that Jack spilt) So I just used one of those for the backing.
See?


So what do ya think? Not to shabby 'eh?


Wednesday, March 16, 2011

Munchkin's Table Makeover

TWO craft posts in one week? You got it!

I'm bad about going into the thrift store/Goodwill with a list of things I already have a plan for... And coming out with things that I have no plan for that will have a plan eventually :)

This little guy was one of them
Doesn't he just looked so sad and helpless! It looks like he might have been a Precious Moments table at a time long, long ago. But everyone deserves a second chance, right? So I snatched him up and bought him at Goodwill for $2.99 and brought him home to start his restoration right away! (that was the plan, I've actually had this table since November and just now got around to fixin' him up, sorry lil' guy!)
Much to my excitment, my wonderful husband jumped at the chance to help me with a project! And I am definitely not one to turn down help with sanding! We decided to use colors to go along with Jack's toy shelf (Or I picked out the colors and they just happened to sort of coordinate, whatever)
After the first coats of paint, still looking pretty rough. Oh and of course we primed it first. HOW could I almost forget that... My son actually spilled the whole can of primer on our kitchen floor. Thank goodness for mineral spirits! We just used plain ole' acrylic paints from Apple Barrel seen in the picture.

The colors match up better than these two pictures make it seem (the picture of the storage bin organizer is from Target's website so the lighting is different). After many, many coats of base paint, I then had to decide what I wanted to do with the table top. Being the "teacher's kid" that I am, I drew from ideas that would help him with his development and learning. Colors and letters! I would paint letters and numbers in all different colors! So that he can point, and ask, and learn! My next dilemma, how do I get the letters/numbers to look somewhat NOT like my son actually did them.
And then.. I found my solution while taking a potty break, litterally.
Behold, Jack's bath toys. Foam letters and numbers included *happy dance*
FYI, they make awesome stamps! And acrylic paints wash out with soap & water so no harm done, they can go back to your child's bathtub after use.

This picture is a little blurry but you can see the start of my stamping (using the same colors I used for the legs). By the end, there were some letters/numbers missing because I think our bathtub ate some of them, but oh well.

And here's the little guy all finished, sealed with some polycrylic, and looking much happier in his new home!
Sorry the picture quality is so bad! But you can see in the second picture, Jack is enjoying his new munchkin table!

Now just have to find some munchkin chairs to go with it! Ikea? I think so :)


P.S. I'm linking to:
A Little Knick Knack


Tuesday, March 15, 2011

A is for Avery


When I came across this tutorial at Mandipidy, I knew I had to try it. I decided on making one for Jack's room. Then I had an Uh-Oh moment. Jack's name (obviously) starts with "J" and J is a very curvy letter. Wrapping yarn evenly around the curviness did not sound that promising. So I started searching for other options. And then I thought of my sweet little Avery (my 6 year old sister).
(How can you not love this girl?)

She sends me stuff ALL the time, and I hardly ever send stuff for her! *sadface* And Avery's name is very cooperative with this project.

I highly suggest you go visit Mandipidy and take a look at the tutorial for the yarn-wrapped letter. She is clean-cut with her instructions, it really helps when you are trying something new! And the best part about the letter is that you only need a couple things (that you probably already have. Toilet paper rolls, scissors, tape, modpodge, yarn, and a paint brush. Thank you, Mandy!

I used a multi-shade pink yarn I had left over from a crochet attempt (that may or may not have got finished). After I finished the letter,

I decided it needed more to get that "I'm finished" look. So I turned to two of my favorite stores.. Goodwill and Dollar Tree. I bought a scratched up frame at Goodwill for $1.99 and found an adorable pair of purple butterflies for $1 while looking for something else in the Dollar Tree. I painted the frame with a couple coats of a high-gloss white acrylic paint I already had. (Sidenote: I didn't use the glass for the frame) The background is a piece of scrapbook paper from my collection of crafty stuff as well, along with the pink sheer ribbon I used for the accents in the corners. My handy, dandy glue gun attached the A to the background and the butterflies to the A. I was pretty impatient while waiting for the paint to dry on the frame. I wanted to get it all put together and see what it looked like

Ta Da!

Hopefully Avery likes it! I think it'll go great it her gareden themed room!